However, you will want to toggle this ability with a gesture or emote, otherwise you will always be in "flight mode". You will want to toggle the ''Fly'' node we made earlier.
However, you will want to toggle this ability with a gesture or emote, otherwise you will always be in "flight mode". You will want to toggle the ''Fly'' node we made earlier.
== Inclined Plane Method (Avatar 3.0) ==
= Inclined Plane Method (Avatar 3.0) =
Same method, but with a few tweaks. Currently being tested.
Same method, but with a few tweaks. Currently being tested.
Revision as of 13:34, 3 November 2020
Here's how to add the ability to fly to your avatar.[1]
Warning:This entire feature relies on a physics bug, which may be fixed in the future.
Note:This guide was written in Unity 2018.4.20f1 on Windows 10. YMMV.
Inclined Plane Method (Avatar 2.0)
Prerequisites
VRCSDK2
A working avatar
Some experience with Unity
Process
With your Unity project open, right-click on your avatar's root node in the scene hierarchy.
Select Create Empty from the context menu.
Rename the new empty GameObject to Fly or something similar.
Right-click Fly in the hierarchy.
Select 3D Object > Cube.
Select your new Cube in the hierarchy.
In the Inspector, set the scale of Cube to:
X: 2
Y: 0.4
Z: 5
Set the rotation of the X axis to -30.
Disable the Mesh Renderer.
Make sure Box Collider is enabled. Leave it at default settings.
Your cube should now look like this:
Ready for take-off.
However, you will want to toggle this ability with a gesture or emote, otherwise you will always be in "flight mode". You will want to toggle the Fly node we made earlier.
Inclined Plane Method (Avatar 3.0)
Same method, but with a few tweaks. Currently being tested.
Right-click on your avatar's root node in the scene hierarchy.
Select Create Empty from the context menu.
Rename the new GameObject to Fly or something memorable.
Right-click Fly in the scene hierarchy.
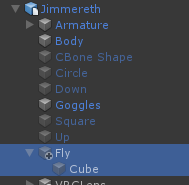
Choose 3D Object > Cube.What your scene hierarchy should look like.You should now see a Cube under the Fly object.
Select Cube.
In the Inspector tab, set the following:
Rotation:
X: -15
Y: 0
Z: 0
Scale:
X: 2
Y: 0.4,
Z: 5
Select the icon on the far right of the Mesh Renderer component.
Choose Remove Component.
Make sure Box Collider is still checked (enabled).
How everything should look.
Now you just need to make a toggle for Fly.
Toggles
Create an animation to enable the Fly object, called Fly On.
Duplicate the avatar in your scene. Name doesn't matter, you can leave it as default.
Open your Animation tab. (Window > Animation > Animation)
Make absolutely certain you have selected the DUPLICATE avatar in your scene.
In your animation tab, click the Create button.
Save the animation somewhere convenient, and name it Fly On.anim.
Click Add Property.
Click the + icon next to Fly > Is Active.
Click the keyframe diamond at the end of the timeline.
Press delete.
Click the keyframe diamond at the beginning of the keyframe.
Check the checkbox next to Fly: Game Object.Is Active to make it active for that keyframe.
Click on the frame line immediately after the 0:00 mark.
Add a new keyframe using the Add Keyframe button.
Make sure that Fly: Game Object.Is Active is still checked.
Add an animation to disable the Fly object, called Fly Off.
Perform the same steps as above, but name it Fly Off, and uncheck the Fly: Game Object.Is Active checkbox.
Delete the duplicate avatar.
Make an expression menu object for your avatar.
Right-click your avatar's assets directory in the Project View.
Create > Folder named Menus.
Right-click the new folder.
Create > VRChat > Avatars > Expressions Menu.
Name it Avatar Root Menu.
Select the avatar's root node in your Scene Hierarchy.
Under your VRC Avatar Descriptor, expand the Expressions section.
Drag Avatar Root Menu into the Menu slot.
Make a parameters object for your avatar.
Right-click your avatar's assets directory in the Project View.

 icon on the far right of the Mesh Renderer component.

 Add Keyframe button.
 button.
 on the far right of the new layer's name.