Color matching: Difference between revisions
Color matching |
|||
| (8 intermediate revisions by the same user not shown) | |||
| Line 2: | Line 2: | ||
== GIMP == | == GIMP == | ||
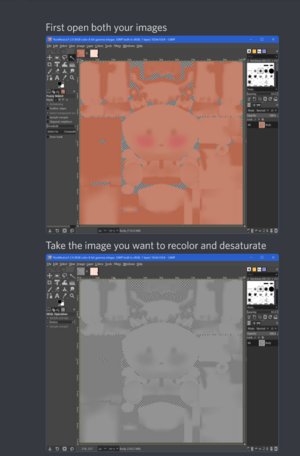
[[File:Gimp recolour | [[File:Guide1.png|frameless]] | ||
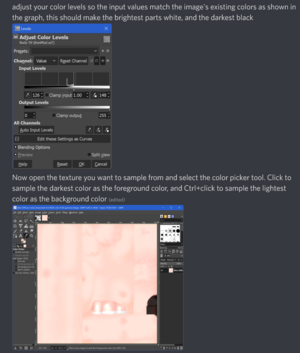
[[File:Gimp recolour 2.png|frameless]] | |||
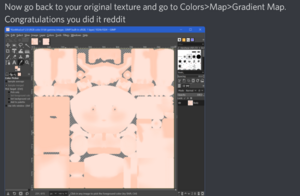
[[File:Gimp recolour 3.png|frameless]] | |||
== Photoshop == | |||
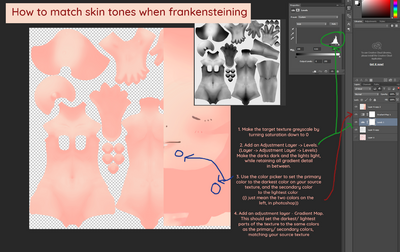
One Method: | |||
[[File:Matching_skin_tones.png|400px|Pls just open the full size image]] | |||
Another method: | |||
[[File:Match2.png|400px|frameless|none|Another matching thing]] | |||
(Editors note: I do not understand method 2 there at all. Method 1 makes a lot more sense and in photoshop you can adjust the gradient mask on the fly when it's set as an adjustment layer so you can tweak it as you go. Including adding more colors, changing the gradient curve, and so on) | |||
== Krita == | |||
1. Download krita. * | |||
2. Find a reference anime girl to take colours from. | |||
3. On any layer you want to change the colours of. Go to Filter > Maps > Gradient Map. | |||
4. Colour sample from the reference image. | |||
5. Adjust gradient accordingly. | |||
6. Hit Create Filter Mask. | |||
7. Copy paste the Filter mask onto any other layers that need similar colours. | |||
8. Adjust accordingly, change layer mix accordingly. | |||
Video: https://files.catbox.moe/vnzu4j.webm | |||
Latest revision as of 19:07, 23 February 2025
Color matching has multiple methods; this one aims to document some.
GIMP
Photoshop
One Method:
Another method:
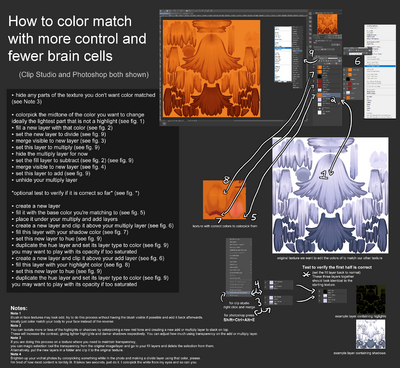
(Editors note: I do not understand method 2 there at all. Method 1 makes a lot more sense and in photoshop you can adjust the gradient mask on the fly when it's set as an adjustment layer so you can tweak it as you go. Including adding more colors, changing the gradient curve, and so on)
Krita
1. Download krita. *
2. Find a reference anime girl to take colours from.
3. On any layer you want to change the colours of. Go to Filter > Maps > Gradient Map.
4. Colour sample from the reference image.
5. Adjust gradient accordingly.
6. Hit Create Filter Mask.
7. Copy paste the Filter mask onto any other layers that need similar colours.
8. Adjust accordingly, change layer mix accordingly.
